A Step-by-Step Guide to Painting Metal Bar Stools
You don’t have to worry about that old or unsightly metal bar stools anymore because you can restyle it and bring it back to life with a classic coat of paint.This can effortlessly allow you to customize the color patterns or finishes of your metal stools to meet your design needs.
While at first it may seem like a simple task, painting metal surfaces entails a bit more than selecting an appropriate paint to ensure it adheres properly.
This blog will discuss everything you need to paint metal bar stools step by step. We provide easy-to-follow instructions for painting metal chairs with light colors over black, painting bar stools or giving your metal furniture an overall facelift.

"The Big Boss" Heavy Duty Metal Barstool with Swivel Bucket Seat
"The Big Boss" heavy-duty metal barstool is made from sturdy, long-lasting material. Its design provides excellent support with its contoured back and a great bucket seat, thus leaving your guests comfortable for as long as they need. The swivel seat also offers smooth movements for your customers to engage freely and be at ease in this particular environment.
![]()
Step 1: Find the Right Tools
Get all the necessary tools and components before commencing the task. This will make the process more efficient, as everything will be on hand, making things quite a bit easier.
Why This Step is Important:
Having the right tools is crucial for obtaining a professional result. If poor materials are selected, the results may yield chipped paint or other subpar markings.
Materials You Will Need:
- Primer: A rust-resistant metal primer is recommended for increased durability.
- Paint: You may choose to use either ordinary spray paint or liquid metal paint.
- Sandpaper: For rough surfaces, use medium grit (80-120) sandpaper. For smoothing, fine grit (200-300) sandpaper will do.
- Cleaning Supplies: Soap, a damp cloth, and a degreaser.
- Masking Tape: for areas that need protection or for designs.
- Sealant or Topcoat: for polish and durability.
Step 2: Thoroughly clean the Metal Stools
The area you are working in needs to be covered with either dry clothes or newspapers.
Cleaning is always a vital step so that the surface is ready to accept paint. Old residue, grease, and dirt that have built up on metal surfaces are hard to remove and left uncleaned; the paint will not set at all.
Why Cleaning Is Important:
If you do not clean it, peeling will occur, as will uneven paint application.
Steps to Clean:
- Remove Surface Dirt: Wipe away any excess water and surface dirt, then use a soft, dry cloth or sponge to gently scrub the rest.
- Focus on Joints and Edges: these areas are where dirt gathers the most, especially seams and. corners.
- Dry Completely: After cleaning, be sure to use a clean, dry cloth to wipe the stools entirely and ensure all excess moisture is gone. Let it all dry so as to ensure that no rust appears.
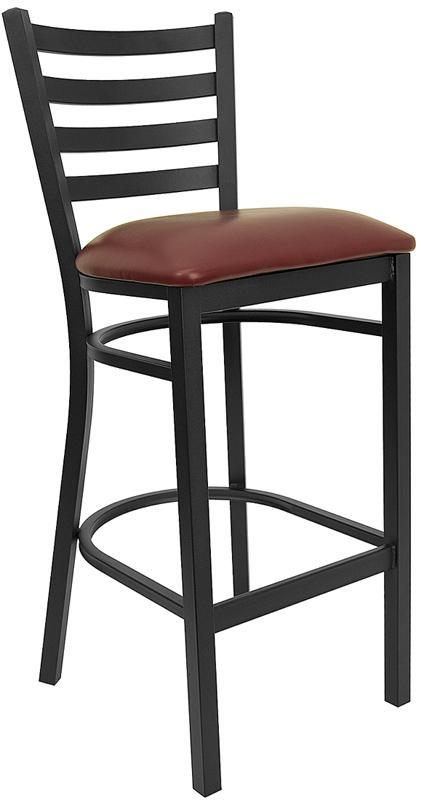
"Heavy Duty Black Ladder Back Metal Restaurant Barstool with Burgundy Vinyl Seat
The metal barstool is a popular choice for furnishing restaurants, pool halls, lounges, bars and other high traffic establishments. This stool is easy to clean, which is an important aspect when it comes to a business. This stool was designed to withstand the daily rigors in the hospitality industry, but will also provide a chic look to your home.
Step 3: Surface Preparation
Sanding roughens up the metal surface by removing excess rust, paint, and other uneven parts. This makes it easier for the primer and metal paint to bond.
Why Sanding is Important:
This helps the paint to bond well and also gives a clean, professional look to the finish.
How to Do Sanding Correctly:
- Start with Coarse SandPaper (80-120): This will remove the rust, old peeling paint, and rough patches.
- Move to a Finer SandPaper (200-300): Once the surface is even, finer sandpaper helps smoothen it even more.
- Focus on the Basics: Sand the corners, legs, and other difficult places that are often missed.
- Cleaning the Surface and Dust: After the sanding process is done, grab a wet cloth to wipe any remaining dust.
Step 4: Primer Application
You should use primer when painting metal stool, especially if you are covering a dark color with a lighter one. Metal primer not only works as an undercoat but also helps in making the paint bond better and last longer.
Why Primers Are Crucial
In the absence of primer, paint videos would create undesirable coatings that might eventually strip off or look patchy.
How to Prepare Primed Stool
- Use a Rust-Proof primer to prevent corrosion from underneath the paint and make the finish more long-lasting.
- Spray or brush on evenly so no drippage occurs. Apply primer in thin, even layers to avoid drips.
- If using spray primer, keep the can about 10 to 12 inches from the surface.
- It is essential to allow the primer to dry thoroughly and according to the manufacturer’s instructions, which is usually between 1 to 2 hours.
Step 5: Paint the Metal Stools
This step is crucial because it allows the painter to fully express their artistic vision. When painting the seats of the stools, be sure to experiment with deep, vibrant colors or broad paint strokes to achieve a smooth and even finish.

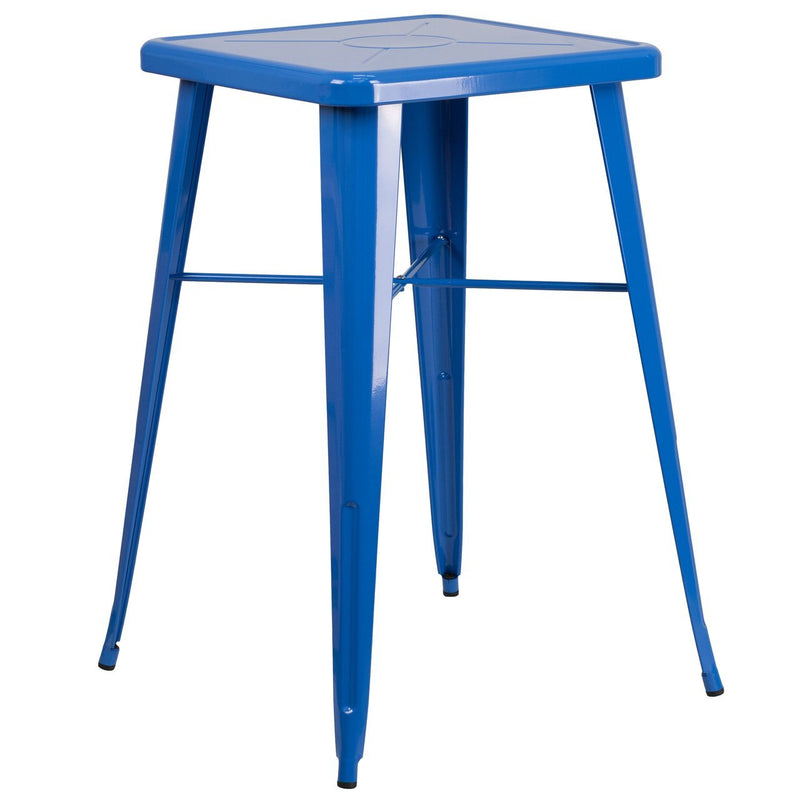
"23.75'' Square Blue Metal Indoor-Outdoor Bar Height Table
With its simple lines and bright color, this indoor-outdoor metal bar height table is sized right for small spaces. Compact in design, the table top is 23.75 inches square and has a 2 inch lip with rounded corners. The legs extend to 27.75 inches in width at the base. The table features a cross-brace that provides increased support and stability. Rubber floor glides protect your floor by sliding smoothly when you need to move the table.
The Essential Details About This Step:
If one paints in a rush, there are bound to be drips, uneven layers, and an unprofessional finish.
How to Paint the Stools:
- Choose the Right Paint: It is necessary to use high-quality paint in spray or liquid form that is specifically designed for metal surfaces.
- Shake the Can: Before starting, shake the can for at least 2 minutes so that the color is evenly spread.
- Use Light Counters First: Apply the first coat and let it dry for 20 to 30 minutes before applying the second one. Rather than applying one thick coat, multiple thin coats help to achieve a smoother surface.
- Focus On The Details: You can use masking tape to section off areas that you do not want to be painted.
- Allow Each Coat to Dry: Each layer must fully dry before proceeding to the next to prevent smearing.
Step 6: Apply a Protective Topcoat
With an acrylic primer perma gloss, the paint will be protected from scratches, moisture, and fading. So don’t forget to apply it.
Why Topcoat Is Important:
To make the lifespan of the paint longer and keep the stool looking new.
How To Apply A Topcoat:
- Select A Sealant For Metal: Search for the metal that blends with your enamel paint.
- Apply Equally: Spray or brush the sealant in light, uniform coats.
- Let It Cure Completely: The stools should only be used after 24 hours. This will ensure the sealant cures without interference.
Step 7: Final Touches
Before calling your work done, ensure there aren't any spots that were left untouched, and all areas are evenly worked on. This ensures all efforts put forth professionally shine.
What to Do:
- Remove Masking Tape: Carefully begin pulling all the tape off to ensure that no paint will peel.
- Check for Flaws: Areas where there are flaws may need a small paintbrush to fix those spots.
- Clean The Work Area: Remove the drop cloth and newspapers, wipe the stools, and make sure there’s no dust.

23.75'' Square Black-Antique Gold Metal Indoor-Outdoor Bar Height Table
With its simple lines and bright color, this indoor-outdoor metal bar height table is sized right for small spaces. Compact in design, the table top is 23.75 inches square and has a 2 inch lip with rounded corners. The legs extend to 27.75 inches in width at the base. The table features a cross-brace that provides increased support and stability.
Conclusion:
In a nutshell, customizing metal bar stools is a relatively simple and inexpensive method to enhance your furnishings and style your living space. By observing these precise instructions, you will obtain an excellent finish that will endure through the years.
Whether you are trying out new techniques of painting bar stools or are trying to figure out how to cover a black metal chair with light paint, this guide remains useful.